


These resources were shared by Sophia White, CLWT-LANA (a certified lymphedema therapist), who presented on the topic during the 2025 FOP Family Gathering. This information is for educational purposes only. Work in collaboration with your local healthcare provider before using these techniques.

What is the Lymphatic System
The lymphatic system is a network of organs, vessels, and tissues that moves a clear fluid called lymph back into the bloodstream. As part of the immune system, it helps protect against infection, removes old or abnormal cells, maintains normal fluid balance, and absorbs fats and fat-soluble vitamins for circulation.
What is Lymphatic Therapy
Lymphatic therapy is the process of gently stretching the skin using manual techniques to support fluid movement in the body. Lymphatic therapy is not the same as massage and does not focus on muscle manipulation. Lymphatic therapy uses minimal pressure to promote circulation and reduce swelling. For people with FOP, working with a certified lymphedema therapist can help reduce inflammation and pain.
Lymphatic Therapy & Support For FOP
FOP Patient Experience
Kim Biro is mom to Trent, who lives with FOP in Canada. Listen as she shares their experiences with lymphatic therapy.
Safety
Always consult your local healthcare provider and FOP expert before beginning lymphatic therapy and ensure your therapist is properly trained. Sessions should be adjusted based on flare status, patient comfort, and tolerance. Any techniques that could risk trauma to tissue should be avoided. Never have lymphatic therapy or perform self lymphatic drainage if you have a fever, infection, blood clot, uncontrolled heart or kidney failure, or are currently undergoing cancer treatment without proper medical clearance.
How to Find a Certified Lymphedema Therapist
CLT's are health care professionals like nurses, physicians, physical therapists, occupational therapists, or massage therapists who have completed additional training in the area of lymphatic therapy and passed a board exam. Below are search engines that can be used to find a CLT in your area:
Lymphology Association of North America
Norton School of Lymphatic Therapy
How To Do Self Lymphatic Drainage
As mentioned in the two videos linked above, there are forms of lymphatic drainage that can be done at home, either between sessions with a therapist or independently if you are unable to find a lymphatic therapist in your local area. The following resources are intended to help families explore lymphatic drainage as a home-based option. If you have questions about applying these techniques at home, please contact Sophia White, CLWT-LANA (a certified lymphedema therapist), by email at [email protected].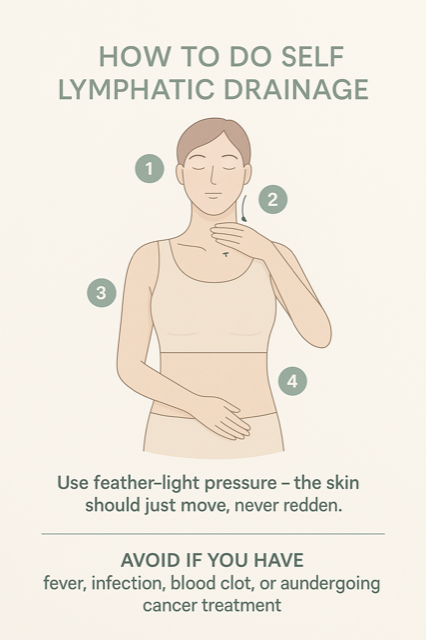
Before you start
Use feather-light pressure – the skin should just move, never redden.
Sit or stand tall and relax your shoulders. Take 3 slow belly breaths (inhale through the nose so the belly rises, exhale slowly).
1) Collarbone – Start the Drain
Place flat fingers just above the collarbones. Make tiny outward circles or gentle 'in-and-release' stretches toward the hollow above the collarbone. Repeat 10 times on each side. This opens the main lymph outlets.
2) Side of Neck → Collarbone
Place fingers on the side of the neck under the ear/jaw. Glide with a soft stretch down toward the collarbone, then release and reset higher. Work the whole side of the neck in sections, 5–10 strokes per section on both sides.
3) Armpit Area – Upper Body Pathway
Slide your hand high into the armpit. Do gentle pumps up and inward toward the armpit, then light sweeps from the upper arm/shoulder toward the armpit. Do 10 pumps in the armpit, then 5–10 sweeps from the upper arm to the armpit.
4) Belly / Lower Trunk
Rest a hand on the lower belly. Take 3–5 slow belly breaths again (belly rises on inhale, softens on exhale). Then make gentle skin stretches on the lower belly toward the groin – right to right, left to left – 5–10 times per side.
Tips
- Slow rhythm: 1–2 seconds per stretch, then release.
- Always aim toward nearby nodes (collarbone, armpit, groin).
- Total session: 5–10 minutes, once or twice daily.
- If one arm/area is swollen, still prepare both sides by using the slow rhythm strokes on both the affected and unaffected sides. This helps to open up the drainage pathways before directing fluid away from the congested area.
Dry Brushing
Dry brushing is the practice of brushing dry skin with light, rhythmic strokes to encourage lymph fluid movement, support natural detoxification, and promote circulation. Dry Brushing can be a complement to lymphatic massage because it stimulates and drains the lymphatic system.
Benefits of Dry Brushing
-
- Stimulates and drains the lymphatic system
- Improves health and texture of the skin
- Promotes detoxification and elimination
- Aids digestion
- Strengthens the immune system
- Stimulates circulation, promoting oxygenation of tissues and organs
Choosing the Right Brush
Using a natural or vegetable bristle brush is an excellent option. Generally, you’ll want a larger brush or one with a bigger brush head made of natural bristles, possibly with a long handle for body brushing. For the face, the brush should also feature natural bristles, but it should be smaller and finer to suit delicate facial skin.
Guidelines for Safe Dry Brushing
-
- Brush only on dry skin: Always avoid brushing on damp or wet skin. This can be integrated into your morning routine, either after you’ve cleaned and dried your face or before cleansing.
-
- Remove jewelry and glasses: Make sure to tie back your hair to keep everything clear of the brushing area.
-
- Use 3 to 6 very gentle strokes: Exercise caution around sensitive areas of your skin.
-
- Be extremely gentle, using 3 to 6 strokes at a time: Brushing should be a pleasant experience, not painful. Use lighter strokes on the face, as its skin is more delicate. If you experience any discomfort, stop and adjust the pressure.
-
- Avoid problematic areas: Do not brush over cuts, wounds, or rashes.
-
- Clean the brush regularly: Wash it with warm water and natural soap at least once a week to maintain hygiene.
-
- Work from left to right: Keep consistency in your brushing routine for the best results.
Dry Brushing The Body
Feet: You can start dry brushing at the feet, brushing all sides from the toes to the ankle.
Legs: Continue brushing from the ankle up the lower leg and to the knee. Then continue from the knee, brushing the thighs, and then brush towards the groin, where there is a concentration of lymph nodes. If you have cellulite on your thighs, you may want to spend a little more time brushing that area.
Buttocks: Brush from the back of your thighs over the buttocks. When you get to the top of the buttocks, brush from the back, around over the hip, and down towards the groin.
Abdomen: It is recommended to brush the lower abdomen from the navel downwards, as the superficial lymphatic flow in this area goes towards the groin. For the upper abdomen, brush from the navel up towards the heart. Brush under the breasts with a sweeping stroke towards the armpits. On the sides of the abdomen, brush upwards to the armpits.
Back: Brush upwards to the shoulder blades. On the upper back, brush from the spine to the shoulders or armpits.
Hands and Arms: Brush both sides of the hands, then work your way to the elbow, then to the armpit and shoulders. Brush the armpit as well because there is a concentration of lymph nodes in this area.
Dry Brushing The Face
Decollete: Brush towards your lymph area from the shoulders and breast area inwards.
Neck: Brush upwards the middle and sides (towards the chin and ears). Brush lightly under your entire chin in short strokes to help firm the skin and bring it stimulation (this area can sag as we age).
Chin: Use inverted U strokes on your chin.
Cheeks: Make circular motions up and outwards, and then back to where you started.
Upper lip: Start in the center and lightly brush outwards, from middle to the left on your left side, from the middle to your right on the right side.
Nose: Make small circular motions on your nose tip. Then move lightly up your nose to the middle of brow area.
Around the eyes: Lightly stroke upward and around your brows, encircling the eyes lightly in a circular motion as shown above. Use especially feathery-light strokes around the eyes!
Finally, end at the forehead. Start in the middle and move right on your right side and leftwards on your left side.
For images and additional information on dry brushing, view this resource
